Friday, 23 January 2015

Text box will accept numeric value with two decimal point

Text box will accept numeric with two decimal point.

The below JQuery function used with onkeypress attribute of textbox.

Code
isNumberKey = function (evt, obj) {
                var charCode = (evt.which) ? evt.which : evt.keyCode + ".10";
               
                if (charCode > 31 && (charCode < 48 || charCode > 57) && charCode != 46
                    && charCode != "46.10" && charCode != "37.10" && charCode != "39.10"
                    && charCode != "9.10" && charCode != "35.10" && charCode != "36.10") {
                    return false;
                }
                else {
                    var cursorPosition = $(obj).getCursorPosition();
                    var dotPosition = obj.value.indexOf('.');                   
                    if (dotPosition == -1)
                    {
                       if (charCode == "9.10" || charCode == 8 || charCode == "37.10" || charCode == "39.10"
                            || charCode == "35.10" || charCode == "36.10" || charCode == "46.10") {
                            // tab, backspace, left arrow, right arrow, home, end, delete
                            return true;
                        }
                        var charBeforedot = obj.value.split('.')[0].length;
                        var valueBeforedot = parseInt(obj.value.split('.')[0]);
                        if (valueBeforedot == 10 && charCode == 48) {
                            return true;
                        }
                        if (valueBeforedot >= 10 && charCode != 46) {
                            return false;
                        }
                        if (valueBeforedot >= 100 || charBeforedot >= 3) {
                            return false;
                        }                       
                        if (dotPosition < 0) {
                            if (charBeforedot >= 2 && charCode != 46) {
                                return false;
                            }
                        }
                    }
                    else if (dotPosition >= cursorPosition) {
                        if (dotPosition >= 0 && charCode == 46) {
                            return false;
                        }
                        if (charCode == "9.10" || charCode == 8 || charCode == "37.10" || charCode == "39.10"
                            || charCode == "35.10" || charCode == "36.10" || charCode == "46.10") {
                            // tab, backspace, left arrow, right arrow, home, end, delete
                            return true;
                        }
                        var charBeforedot = obj.value.split('.')[0].length;
                        var valueBeforedot = parseInt(obj.value.split('.')[0]);
                        if (valueBeforedot == 10 && charCode == 48) {
                            var valueAfterdot = parseInt(obj.value.split('.')[1]);
                            if (valueAfterdot > 0) {
                                return false;
                            }
                            else {
                                return true;
                            }
                        }
                        if (valueBeforedot >= 10 && charCode != 46) {
                            return false;
                        }
                        if (valueBeforedot >= 100 || charBeforedot >= 3) {
                            return false;
                        }                                              
                    }
                    else {
                        if (charCode == "9.10" || charCode == 8 || charCode == "37.10" || charCode == "39.10"
                            || charCode == "35.10" || charCode == "36.10" || charCode == "46.10") {
                            // tab, backspace, left arrow, right arrow, home, end, delete
                            return true;
                        }
                        if (dotPosition >= 0) {
                            var valueBeforedot = parseInt(obj.value.split('.')[0]);
                            if (valueBeforedot >= 100 && charCode != 48)
                            {
                                return false;
                            }
                            var len = obj.value.length;
                            var charAfterdot = (len + 1) - dotPosition;
                            if (charCode == 46)
                            {
                                return false;
                            }
                            if (charAfterdot > 3) {
                                return false;
                            }
                        }
                    }
                }
                return true;
            }

Wednesday, 19 February 2014

Datatypes in SQL Server

Char DataType
Char datatype which is used to store fixed length of characters. Suppose if we declared char(50) it will allocates memory for 50 characters. Once we declare char(50) and insert only 10 characters of word then only 10 characters of memory will be used and other 40 characters of memory will be wasted.

varchar DataType
Varchar means variable characters and it is used to store non-unicode characters. It will allocate the memory based on number characters inserted. Suppose if we declared varchar(50) it will allocates memory of 0 characters at the time of declaration. Once we declare varchar(50) and insert only 10 characters of word it will allocate memory for only 10 characters.

nvarchar DataType
nvarchar datatype same as varchar datatype but only difference nvarchar is used to store Unicode characters and it allows you to store multiple languages in database. nvarchar datatype will take twice as much space to store extended set of characters as required by other languages.

Bit DataType
This datatype represents a single bit that can be 0 or 1.

tinyint DataType
This datatype represents a single byte which is used to store values from 0 to 255 (MinVal: 0, MaxVal:255). Its storage size is 1 byte.

smallint DataType
This datatype represents a signed 16-bit integer which is used to store values from -2^15 (-32,768) through 2^15 - 1 (32,767) and its storage size is 2 bytes.

int DataType
This datatype represents a signed 32-bit integer which is used to store values from -2^31(-2,147,483,648) to 2 ^31-1(2,147,483,647). Its storage size is 4 bytes.

Bigint DataType
This datatype represents a signed 64-bit integer which is used to store values from -2^63 (-9223372036854775808) through 2^63-1 (9223372036854775807). Its storage size is 8 bytes.

LEN and DATALENGTH Functions in SQL Server

Len() function

Len() function will return number of characters in the string expression excluding only the trailing blanks. Internally it performs RTRIM() operation and give you the count of characters. But it counts the leading blank character.

DataLength() function

DataLength() function will return number of bytes to represent any expression. It returns the storage space required for the characters. It counts the trailing blank space.

Difference between ExecuteScalar, ExecuteReader and ExecuteNonQuery?

  • ExecuteScalar is going to be the type of query which will be returning a single value. An example might be SELECT @@IDENTITY AS 'Identity'. 
  • ExecuteReader gives you a data reader back which will allow you to read all of the columns of the results a row at a time. A(e.g., SELECT col1, col2 from sometable). 
  • ExecuteNonQuery is any SQL which isn't returning values really, but is actually performing some form of work like inserting deleting or modifying something. (e.g., UPDATE, INSERT, etc.).
DataAccessLayer
public class MsSqlQueryParameters
    {
        private SqlParameter SQLParam;
        private ArrayList ParamArray;

        public MsSqlQueryParameters()
        {
            ParamArray = new ArrayList();
        }

        public void Add(string ParamName, SqlDbType ParamType, object ParamValue)
        {

            SQLParam = new System.Data.SqlClient.SqlParameter();
            SQLParam.SqlDbType = ParamType;
            SQLParam.ParameterName = ParamName;
            SQLParam.Value = ParamValue;
            ParamArray.Add(SQLParam);
        }

        public void Add(string ParamName, SqlDbType ParamType, object ParamValue, int ParamLength)
        {

            SQLParam = new System.Data.SqlClient.SqlParameter();
            SQLParam.SqlDbType = ParamType;
            SQLParam.ParameterName = ParamName;
            SQLParam.Value = ParamValue;
            SQLParam.Size = ParamLength;
            ParamArray.Add(SQLParam);
        }

        public void ClearAll()
        {
            try
            {
                ParamArray.Clear();
            }
            catch
            {

            }
        }

        public ArrayList QueryParam
        {
            get
            {
                return ParamArray;
            }
        }
    }

public DataSet GetDataSet(string SQLQuery, CommandType Type, MsSqlQueryParameters Parameters)
        {
            if (dbCon.State == ConnectionState.Closed)
                dbCon.Open();
            command = new SqlCommand(SQLQuery, dbCon);
            command.CommandType = Type;
            if (Parameters != null)
            {
                foreach (SqlParameter ParameterItem in Parameters.QueryParam)
                {
                    command.Parameters.Add(ParameterItem);
                }
            }
            dSet = new DataSet();
            dataAdapter = new SqlDataAdapter(command);
            if (maxrecords > 0)
                dataAdapter.Fill(dSet);
            else
                dataAdapter.Fill(dSet, tblName);

            //object AffCnt = null;
            //command.CommandTimeout = 120;
            //AffCnt = command.ExecuteScalar();
            ////AffCnt = command.ExecuteNonQuery();

            dataAdapter.Dispose();
            command.Dispose();
            dbCon.Close();
            return dSet;
        }

BusinessAccessLayer

private MsSqlDataProxy dataLayer = null;

private MsSqlQueryParameters parameters = null;

public DataSet GetAllAdmission()
        {
            parameters.ClearAll();
            parameters.Add("@method", SqlDbType.NVarChar, BLConstants.Query_GetALL, 25);
            parameters.Add("@admissionId", SqlDbType.BigInt, 0);
            dataSet = dataLayer.GetDataSet("SPGetAdmission", "TblAdmission", CommandType.StoredProcedure, parameters);
            return dataSet;

        }

private Admission fillAdmission(DataRow dr)
        {
            Admission admissionFile = new Admission();
            if (dr != null)
            {
                if (dr["admissionId"] != DBNull.Value)
                    admissionFile.AdmissionId = (long)dr["admissionId"];
                if (dr["admissionType"] != DBNull.Value)
                    admissionFile.AdmissionType = (int)dr["admissionType"];
                if (dr["title"] != DBNull.Value)
                    admissionFile.Title = (string)dr["title"];
                if (dr["shortDescription"] != DBNull.Value)
                    admissionFile.ShortDescription = (string)dr["shortDescription"];
                if (dr["filename"] != DBNull.Value)
                    admissionFile.Filename = (string)dr["filename"];
                if (dr["createdDate"] != DBNull.Value)
                    admissionFile.CreatedDate = Convert.ToDateTime(dr["createdDate"]);
                if (dr["modifiedDate"] != DBNull.Value)
                    admissionFile.ModifiedDate = Convert.ToDateTime(dr["modifiedDate"]);
            }
            return admissionFile;

        }

Wednesday, 23 October 2013

Show the Content in Grid Format using WebGrid and Foreach

Displaying data using Webgrid with ajax 

Controller.cs

public ActionResult WebgridSample()
{
            ObservableCollection<Student> FeeRemaining = new ObservableCollection<Student>();
            FeeRemaining.Add(new Student { RollNo = "08330001", Name = "Surbhi", Branch = "C.S", FeeRemaining = 18000 });
            FeeRemaining.Add(new Student { RollNo = "08330004", Name = "Arun", Branch = "C.S", FeeRemaining = 2500 });
            FeeRemaining.Add(new Student { RollNo = "08329006", Name = "Ankita", Branch = "I.T", FeeRemaining = 31000 });
            FeeRemaining.Add(new Student { RollNo = "08329007", Name = "Anshika", Branch = "I.T", FeeRemaining = 9450 });
            FeeRemaining.Add(new Student { RollNo = "08329014", Name = "Anubhav", Branch = "I.T", FeeRemaining = 2670 });
            FeeRemaining.Add(new Student { RollNo = "08311023", Name = "Girish", Branch = "E.N", FeeRemaining = 11200 });
            FeeRemaining.Add(new Student { RollNo = "08311024", Name = "Yogesh", Branch = "E.N", FeeRemaining = 3370 });
            return View(FeeRemaining);
}

View.cshtml

<html>
<head>
    <title>Fee Remaining in Webgrid</title>
    <script src="../../Scripts/jquery-1.7.1.min.js" type="text/javascript"></script>
    <style type="text/css">
        .table { margin: 4px;  width: 500px;  background-color:#FCFCFC;}
        .head { background-color: #C1D4E6; font-weight: bold; color: #FFF; }
        .webGrid th, .webGrid td { border: 1px solid #C0C0C0; padding: 5px; }
        .altRow { background-color: #E4E9F5; color: #000; }
        .gridHead a:hover {text-decoration:underline;}
        .description { width:auto}
        .selectRow{background-color: #389DF5}
    </style>
</head>
<body>
@{
    WebGridSampleApplication.Models.Student Student = new WebGridSampleApplication.Models.Student();
}
    @{
    var gd = new WebGrid(Model, canPage: true, rowsPerPage: 5, selectionFieldName: "selectedRow",ajaxUpdateContainerId: "gridContent");
        gd.Pager(WebGridPagerModes.NextPrevious);}
        <div id="gridContent">
        @gd.GetHtml(tableStyle: "table",
                headerStyle: "head",
                alternatingRowStyle: "altRow",
                selectedRowStyle: "selectRow",
                columns: gd.Columns(
                gd.Column("RollNo", format: (item) => item.GetSelectLink(item.RollNo)),
                gd.Column("Name", " Name"),
                gd.Column("Branch", "Branch", style: "description"),
                gd.Column("FeeRemaining", "FeeRemaining")
         ))
    @if (gd.HasSelection)
         {
             Student = (WebGridSampleApplication.Models.Student)gd.Rows[gd.SelectedIndex].Value;
             <b>Roll No</b> @Student.RollNo<br />
             <b>Name</b>  @Student.Name<br />
             <b>Branch</b> @Student.Branch<br />
             <b>Remaining Fee</b> @Student.FeeRemaining<br />
         }
    </div>    
</body>
</html>

Displaying data using foreach loop

 <table>
        @foreach (var item in Model)
        {
            <thead>
                <tr>
                    <th>RollNo</th>
                    <th>Name</th>
                    <th>Branch</th>
                    <th>Fee Remaining</th>
                </tr>
            </thead>
            <tr>
                <td class="left">@item.RollNo</td>
                <td class="left">@item.Name</td>
                <td class="left">@item.Branch</td>
                <td class="right">@item.FeeRemaining</td>
            </tr>
 
        }

    </table>

Saturday, 6 July 2013

Potentially dangerous Request.Form value was detected from the client


'A Potentially dangerous Request.Form value was detected from the client'

This is a common error that ASP.NET developers have run into many times. We will see in this post a few ways on how to avoid it. 

Reason
       By default, ASP.NET performs request validation to prevent people from uploading HTML markup or script to your site. ASP.NET checks the content of the form sent to the server to prevent cross-site scripting(xss).  

This error is caused by a newly introduced feature of .NET Framework 1.1, called "Request Validation."  This feature is designed to help prevent script-injection attacks whereby client script code or HTML is unknowingly submitted to a server, stored, and then presented to other users.

Note that anything between '<' and '>' is considered dangerous, and it doesn't have to necessarily closes the tag with '<' ("<a" would have be considered potentially dangerous). ASP.NET validates query string as well.

Try it:
To overcome this error first try to disable the request validation feature, because the validation is done by ASP.NET before any of your code.
<%@ Page ValidateRequest="false" %>

Or you can disable it for your entire application in the web.config file:
<configuration>
    <system.web>
        <pages validateRequest="false" />
    </system.web>
</configuration>

ASP.Net 4.0?
        In ASP.Net 2.0, request validation is enabled for only ASP.Net pages and validated when those pages are executing. Whereas in ASP.Net 4.0, by default request validation is enabled for all requests. As a result validation applies to not only to ASP.Net pages but also to the Web service calls, Http handlers etc.. To prevent this error simply revert ASP.Net behavior back to 2.0. 
To do this, add a configuration element in Web.Config.
<httpRuntime requestValidationMode="2.0" />

Thursday, 27 June 2013

Image upload with CKEditor

CKeditor is one of the most widely used WYSIWYG editors for web applications. Overtime, the CKeditor continued to evolve by adding new features that made HTML text editing a lot easier. When using a WYSIWYG editor, we will often need to upload image to server and embed it in the HTML content. By default, the CKeditor will support embedding an image that are already uploaded or from an external source by providing its URL.

In this article, let’s see how we can upload image to our website and embed it in CKeditor by below easy solution. The CKeditor has a property called filebrowserImageUploadUrl which will provide an option to upload images to the server when configured. This property takes a file uploader (a page or a handler) url to upload the selected image to the server. The handler that is responsible for uploading the image should return back the URL of the image to display in the CKeditor. Once filebrowserImageUploadUrl property is configured, you will be able to see a new tab called “Upload” in Image Properties pop-up of CKeditor.

Follow the below steps to integrate image upload functionality with CKEditor in ASP.NET. Here the solution.
1. Create a New ASP.NET Website “CKeditorDemo”.
2. 
 Download CKEditor and extract in your web folder root.
3. Create a new folder named “Images” in your web folder root.
4. Add the new ASHX Handler file (.ashx) “Upload.ashx” and Copy Paste below code into “Upload.ashx”

<%@ WebHandler Language="C#" Class="Upload" %>
using System;
using System.Web;
public class Upload : IHttpHandler {   
    public void ProcessRequest (HttpContext context) {
       HttpPostedFile uploads = context.Request.Files["upload"];
       string CKEditorFuncNum = context.Request["CKEditorFuncNum"];
       string file = System.IO.Path.GetFileName(uploads.FileName);
       uploads.SaveAs(context.Server.MapPath(".") + "\\Images\\" + file);
//provide direct URL here
       string url = "http://localhost/CKeditorDemo/Images/" + file; 
       
context.Response.Write("<script>window.parent.CKEDITOR.tools.callFunction(" +                                             CKEditorFuncNum + ", \"" + url + "\");</script>");
       context.Response.End();            
    }

    public bool IsReusable {
        get { return false; }
    }
}

5. Call the script and declare Textbox with ID="txtCkEditor" in .aspx file
<script type="text/javascript" src="Scripts/jquery-1.4.1.min.js"></script>
<script type="text/javascript" src="ckeditor/ckeditor.js"></script>
<script type="text/javascript" src="ckeditor/adapters/jquery.js"></script>
<script type="text/javascript">
    $(function () {
CKEDITOR.replace('<%=txtCkEditor.ClientID %>', { filebrowserImageUploadUrl:  '/CKeditorDemo/Upload.ashx' }); //path to “Upload.ashx”
    });
</script>

<asp:TextBox ID="txtCkEditor" TextMode="MultiLine" runat="server"></asp:TextBox>

6. You are done with the setting. Now run the website you will see the CKEditor configured in the page.


7. Then choose the image icon in the CKEditor to upload the Image.

8. Select the image by clicking Browse button in Upload tab and select “Send it to the Server” button to save the image in server.

9. The uploaded image is displayed in the CKEditor after clicking “OK”.

Thursday, 23 May 2013

Working with Knockout.js


Knockout(KO) is a JavaScript library that helps you to create rich, responsive display and editor user interfaces with a clean underlying data model. KO provides a simple two-way data binding mechanism between your data model and UI means any changes to data model are automatically reflected in the DOM (UI) and any changes to the DOM are automatically reflected to the data model.

Since Knockout is a purely client-side library, it has the flexibility to work with any server-side technology (e.g., ASP.NET, Rails, PHP, etc.), and any architectural pattern, database, whatever. As long as your server-side code can send and receive JSON data — a trivial task for any half-decent web technology

Key Concepts:
  • Declarative Bindings - Easily associate DOM elements with model data using a concise, readable syntax.
  • Automatic UI Refresh - When your data model's state changes, your UI updates automatically.
  • Dependency Tracking - Implicitly set up chains of relationships between model data, to transform and combine it.
  • TemplatingQuickly generate sophisticated, nested UIs as a function of your model data.

Additional benefits:
  • Declarative Bindings - Pure JavaScript library - works with any server or client-side technology.
  • Can be added on top of your existing web application without requiring major architectural changes.
  • Comprehensive suite of specifications (developed BDD-style) means its correct functioning can easily be verified on new browsers and platforms.
More Features:
  • Free, open source.
  • Pure JavaScript — works with any web framework
  • Small & lightweight — 40kb minified. (... reduces to 14kb when using HTTP compression)
  • No dependencies
  • Supports all mainstream browsers
    IE 6+, Firefox 2+, Chrome, Opera, Safari (desktop/mobile)

Knockout.js uses a Model-View-ViewModel (MVVM) design pattern in which the model is your stored data, and the view is the visual representation of that data (UI) and ViewModel acts as the intermediary between the model and the view.

                                         Model   <---------> View Model <---------> View

ViewModel is a JavaScript representation of the model data, along with associated functions for manipulating the data. Knockout.js creates a direct connection between the ViewModel and the view, which helps to detect changes to the underlying model and automatically update the right element of the UI.

Simple Example

1. View(HTML)
<h2>Your Seat reservations</h2>
<table>
    <thead><tr>
        <th>Passenger name</th><th>Meal</th><th>Surcharge</th><th></th>
    </tr></thead>
    <tbody data-bind="foreach: seats">
    <tr>
        <td data-bind="text: name"></td>
        <td data-bind="text: meal().mealName"></td>
        <td data-bind="text: meal().price"></td>
    </tr> 
</tbody>
</table>

2. View Model(Javascript)
// Class to represent a row in the seat reservations grid
function SeatReservation(name, initialMeal) {
    var self = this;
    self.name = name;
    self.meal = ko.observable(initialMeal);
}
// Overall viewmodel for this screen, along with initial state
function ReservationsViewModel() {
    var self = this;
    // Non-editable catalog data - would come from the server
    self.availableMeals = [
        { mealName: "Standard (sandwich)", price: 10.11 },
        { mealName: "Premium (lobster)", price: 34.95 },
        { mealName: "Ultimate (whole zebra)", price: 290 }
    ]; 

    // Editable data
    self.seats = ko.observableArray([
        new SeatReservation("Steve", self.availableMeals[0]),
        new SeatReservation("Bert", self.availableMeals[1])
    ]);
}

ko.applyBindings(new ReservationsViewModel());

3. OUTPUT

Wednesday, 15 May 2013

SQL Query to find starting and ending date of every week in a month


DECLARE @iloop int
DECLARE @Tot_Weeks Int
DROP TABLE #Weeks
CREATE TABLE #Weeks(Weekno int identity(1,1),[Start Of Week] date, [End Of Week] date )
---Input the date Here
declare @dt date = cast('2013-06-01' as date);
declare @dtstart date =  DATEADD(day, -DATEPART(day, @dt) + 1, @dt);
declare @dtend date = dateadd(DAY, -1, DATEADD(MONTH, 1, @dtstart));
--Find the Total Number of Weeks
SELECT @Tot_Weeks = DATEDIFF (week, DATEADD (m, DATEDIFF (m, 0, @dtend), 0), @dtend) + 1
Set @iloop = 0
WHILE (@iloop < @Tot_Weeks)
BEGIn
PRINT @iloop
If(@iloop = 0)
Begin
INSERT INTO #Weeks
SELECT @dtstart as [Start Of Week] , Cast( DATEADD(s,-1,DATEADD(WK, DATEDIFF(WK,0,CAST(@dtstart AS DATE))+1,0))-1 as DATE) as [End Of Week]
End
ELSE IF(@iloop = (@Tot_Weeks-1))
BEGIN
INSERT INTO #Weeks
SELECT  Cast( DATEADD(WK, DATEDIFF(WK,0,CAST(@dtstart AS DATE)),-1) as Date) as [Start Of Week] ,  @dtend as [End Of Week]
END
Else
Begin
INSERT INTO #Weeks
SELECT  Cast(DATEADD(WK, DATEDIFF(WK,0,CAST(@dtstart AS DATE)),-1) as Date) as [Start Of Week] , Cast( DATEADD(s,-1,DATEADD(WK, DATEDIFF(WK,0,CAST(@dtstart AS DATE))+1,0))-1 as DATE) as [End Of Week]
End
Set @dtstart = DATEADD(DD,7,CAST(@dtstart AS DATE))
Print @dtstart
SET @iloop = @iloop + 1
END

Select * from #Weeks

Monday, 6 May 2013

What is .Net ?


What is .Net 

.Net is a software development platform developed by Microsoft. It is developed by microsoft to compete Java in the market. Using .net there is no need to learn new programming language. It supports 48 programming languages like as C, C++, C#, J#, VB etc. Hence we can do programming in any programming language in which you feel comfortable to yourself. Infact .Net is a collection of :
  1. .Net products :

    Visual Studio 2001, 2003, 2005, 2008, 2010, 2012
  2. .Net Service :

    Webservices, Window comunication foundation (WCF), Web API
  3. .Net framework :

    Integrated development environment (IDE), Software development kit (SDK)

.Net versions released

  1. 1.0 released on 13 feb 2002.
  2. 1.1 released in apr 2003.
  3. 2.0 released on 7 nov 2005.
  4. 3.0 released on 6 nov 2006.
  5. 3.5 released on 19 nov 2007.
  6. 4.0 released on 12 apr 2010.
  7. 4.5 released on 15 aug 2012.

Platform support

  1. .Net framework runs on Window Xp, Window 2000, NT4, ME/98, SP6a, Vista, Window 7 & 8, Window Server 2003, 2008 & 2012
  2. Window 95 is not supported.
  3. Window 98/ME can't be used for development.

.Net Framework

.Net framework is a tool of .Net platform for building, deploying and running webservices, web applications and window applications. Mazor elements of .Net framework are CLR (common language runtime), FCL(framework class library), webservices, window & webforms/applications.

Features of .Net framework

  1. It is a layer between operating system(OS) and programming language.
  2. It supports many programming languages.
  3. .Net provides a common set of class library which can be accessed from any .Net based programming language.      

Friday, 3 May 2013

Shortcut Key in SQL Server Management Studio


Shortcut Key in Sql Server Management Studio

Launching SSMS

START -> Run or press Windows + R, type ssms and click OK (or hit ENTER) which will launch SSMS.
You can also specify different parameters or switches
  • The -E switch will let you connect to the local instance using Windows authentication.
  • The -U switch is used to specify a user and -P to specify the password
  • If you want SSMS to connect to a specific database you can use the -d switch
  • If you want a script file to be opened in SSMS you can specify the location and name of the file. This will just open the file in SSMS and will not execute the code. If you need to execute a script file you can use the SQLCMD utility.
  • To close SSMS you can use ALT+F4.

You can simply open the SSMS or you can specify the -E switch to open SSMS and connect using Windows authentication. If the current user does not have sufficient permissions obviously it will fail.

When we open SSMS a splash screen appears while loading SSMS in the memory. You can specify -nosplash switch which opens SSMS without the splash screen.

You can use -? which gives you the different command options as shown below. 


Table Details

            If you select a table name in the query window of Sql Server Management Studio
and press ALT + F1 it will display the details of that table.

In the background shortcut key will execute sp_help on your behalf, so in this example it executes: sp_help users, which is much quicker than typing it.


Otherwise you can also use sp_columns test_tbl


Changing Databases

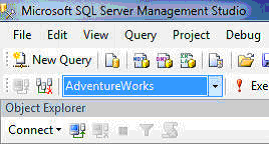
Once you are in a Query Window in SSMS you can use CTRL+U to change the database. When you press this combination, the database combo-box will be selected as shown below. You can then use the UP and DOWN arrow keys to change between databases (or type a character to jump to databases starting with that character) select your database and hit ENTER to return back to the Query Window.


Changing Code Case (Upper or Lower)

When you are writing code you may not bother with using upper or lower case to make your code easier to read. To fix this later, you can select the specific text and hit CTRL+SHIFT+U to make it upper case or use CTRL+SHIFT+L to make it lower case as shown below.


Commenting Out Code

When writing code sometimes you need to comment out lines of code. You can select specific lines and hit CTRL+K followed by CTRL+C to comment it out and CTRL+K followed by CTRL+U to uncomment it out as shown below.

 Indenting Code

As a coding best practice you should to indent your code for better readability. To increase the indent, select the lines of code (to be indented) and hit TAB as many times as you want to increase the indent likewise to decrease the indent again select those lines of code and hit SHIFT+TAB.


There are many shortcut keys that are listed below.

Action
SSMS-Shortcut Key
Display the Query Designer
CTRL+SHIFT+Q
Close a menu or dialog box, canceling the action
ESC
Cancel a query
ALT+BREAK
Connect
CTRL+O
Disconnect
CTRL+F4
Disconnect and close child window
ALT+F4
Database object information
ALT+F1
Go to a line number
CTRL+G
Remove comments
CTRL+SHIFT+R
Execute a query
F5 or Ctrl + E
New Query window
CTRL+N
Object Browser (show/hide)
F8
Parse the query and check syntax
CTRL+F5
Display results in grid format
CTRL+D
Display results in text format
CTRL+T
Use database
CTRL+U